EdExchange Onboarding Guide for Service Providers
About this Guide
This guide provides detailed, step-by-step instructions on how to deploy the reference implementation of the network server to send and receive documents using EdExchange. Upon completion of this guide, your organization will have become an active member of the EdExchange network and have successfully requested and received a PESC college transcript with Butte College based on test data and test student "John Doe".
Step 1: Join the EdExchange Network
To add your organization to the EdExchange directory, complete registration form. Make sure to check the "Service Provider" checkbox to indicate your organization is a service provider. If your organization is also an institution, check the "Institution" checkbox too.
Step 2: Deploy a Server
The purpose of this section is to deploy an Ubuntu based Linux server that will be used to host the reference implementation of the EdExchange network server on the internet. For the purpose of this guide, Amazon Web Services (AWS) will be used to create and deploy the server. However, you may optionally choose to host the server any way you like and still use this guide, provided the operating system is Ubuntu 16.04 LTS.
Upon completion of this section, you will have a an Ubuntu 16.04 LTS server that is ready to be provisioned with the reference implementation of the EdExchange network server.
Step 2a: Sign In to the AWS console
Log into the AWS console located at https://aws.amazon.com/console/. If this link no longer works, do a Google search on "Amazon Web Services console" and use the search results to find the AWS console. Select the "Sign In To the Console" button and login. If you don't have an Amazon account that is appropriate for hosting the EdExchange network server, you'll need to create an Amazon account.
Step 2b: Open EC2 Dashboard
The server will be deployed as an EC2 instance. There are various ways to load the EC2 console, one of which is to select "Services/EC2" from the main AWS dashboard (the landing page that is presented after you've logged into the AWS console.
Step 2c: Create a Server Instance
If you've followed the instructions so far, the EC2 dashboard should be presented and you should see an option called "Lanuch Instance" in the "Create Instance" area of the dashboard. Select "Launch Instance" and you will be prompted for the required information as shown in the steps below.
- Choose an Amazon Machine Image (AMI) You will be presented with several operating system choices during this part of the process. You should choose the Ubuntu instance which is currently shown as "Ubuntu Server 16.04 LTS (HVM), SSD Volume Type - ami-7c803d1c.
- Choose an Instance Type You will be presented with several hardware options during this part of the process. Select an instance type that makes sense for the amount of network traffic you expect to have. Initially, you many choose to use the free tier just to establish your presence on the EdExchange network. Later, you can change the instance type to something more appropriate.
Step 2d: Start the Server
After you've selected the operating system and instance type, select select "Review and Launch". Review the information that's provided about the server instance and then select "Launch". Once the server is started, you'll need some way to connect to the server so that you can provision the server with the EdExchange software and start the network server. AWS allows remote connections to the running server by use of a public/private key pair. At this point in the process, you should be presented with an option to use an existing key pair (if you have already created one during a similar process with a different server) or to create a new pair.
You may use an existing key pair if you already have one. If you don't want to using existing key pair or you don't have one, select "Create a new key pair" and give it a name that makes sense, such as "EdExchange". Select "Download key pair" and save it somewhere safe and where you can easily access it. Note where you save it. If you lose this file, you won't be able to remotely access the server.
After you've downloaded your public/private key pair to your local system, select "Launch Instance". You will be presented with a page that shows the name of the new EC2 instance. For example:
                Your instances are now launching.
                The following instance launches have been initiated: i-0fe3dc9b47b98fb63
Note the name of your new server instance, for example "i-0fe3dc9b47b98fb63" as shown above. The
"i-0fe3dc9b47b98fb63" should be a link, that when selected, will present the status of the instance.
In the future, you can also find your running instances by selecting "Services/EC2" from the main AWS dashboard and then selecting "Running instances"
Wait until the server instance is in the "Running" state before continuing to the next step.
Step 2e: Assign a Static IP Address
The purpose of this step is to allocate an static IP address that will not change whenever the AWS server instance is restarted. Without this step, the AWS server instance is not guaranteed to have the same IP address if it's ever restarted.
From the EC2 Dashboard (where you can see your running server instance under "Instance" menu item), select the "Elastic IPs" menu item and then select "Allocate new address" and then "Allocate". You should be presented with a dialog that shows the IP address, similar to the one here:
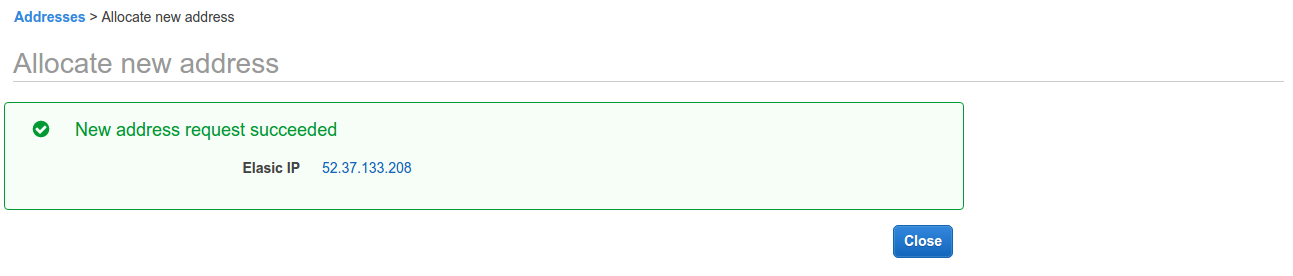
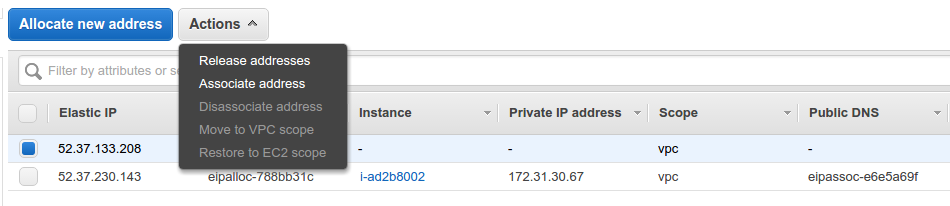
Note the IP address and close the dialog. Next, select the IP address you just created from the list of Elastic IP Addresses and from the Actions dropdown, select "Associate address". Using the dialog, associate the IP address with your newly created server instance using the server name you noted earlier in the process. E.g. i-0fe3dc9b47b98fb63
Step 3: Provision the Server
In this section, you will provision the server with the latest EdExchange software---the reference implementation of the network server. This step includes downloading the software to the AWS server instance and building the network server.
Step 3a: Connect to the AWS Server
At this point in the process, you should have a running AWS server instance. This section describes how to remotely connect to the running server so that you can download and build the EdExchange Network Server software.
The method you use to connect to the running server depends on what operating system you use on your local host. This is the same computer on which you saved your public/private key pair. Amazon has provided instructions for each operating system...
| Your Computer | How to Connect |
|---|---|
| Linux | Connecting to Your Linux Instance Using SSH |
| Windows | Connecting to Your Linux Instance from Windows Using PuTTY |
| All | Connecting to Your Linux Instance Using MindTerm |
The remainder of this section provides abbreviated instructions on how to connect to the server using SSH on Linux. It assumes you used the suggested name "EdExchange" for your private key. If you saved the private key using a different name, substitute "EdExchange" with whatever name you used. If the instructions here don't work for you, consult the documentation from Amazon in the table above.
                        The authenticity of host 'ec2-52-32-59-26.us-west-2.compute.amazonaws.com (52.32.59.26)' can't be established.
                        ECDSA key fingerprint is a9:f9:a6:80:69:95:98:6c:d5:38:a1:dc:8b:79:2b:eb.
                        Are you sure you want to continue connecting (yes/no)?
Step 3b: Get the Network Server Software
Step 3c: Build the Network Server Software
Warning: JAVA_HOME environment variable is not set.
Apache Maven 3.3.9
Maven home: /usr/share/maven
Java version: 1.8.0_121, vendor: Oracle Corporation
Java home: /usr/lib/jvm/java-8-openjdk-amd64/jre
Default locale: en_US, platform encoding: UTF-8
OS name: "linux", version: "4.4.0-59-generic", arch: "amd64", family: "unix"
You'll notice the warning: Warning: JAVA_HOME environment variable is not set.This will be addressed in the next step.
The output should be similar to the following:
                    java version "1.8.0_121"
                    Java(TM) SE Runtime Environment (build 1.8.0_121-b13)
                    Java HotSpot(TM) 64-Bit Server VM (build 25.121-b13, mixed mode)
                     Reactor Summary:
                    [INFO]
                    [INFO] Directory Server ................................... SUCCESS [01:52 min]
                    [INFO] pesc-sdk ........................................... SUCCESS [ 44.928 s]
                    [INFO] network-server ..................................... SUCCESS [ 51.302 s]
                    [INFO] PESC CDS EdExchange ................................ SUCCESS [  0.017 s]
                    [INFO] ------------------------------------------------------------------------
                    [INFO] BUILD SUCCESS
Step 3d: Create the Database
You should still be connected to your AWS server instance. From the command prompt, run the following command:
$ sudo apt-key adv --keyserver hkp://p80.pool.sks-keyservers.net:80 --recv-keys 58118E89F3A912897C070ADBF76221572C52609D
The output should be similar to the following:
Executing: /tmp/tmp.DaSy8lV3dd/gpg.1.sh --keyserver hkp://p80.pool.sks-keyservers.net:80 --recv-keys 58118E89F3A912897C070ADBF76221572C52609D gpg: requesting key 2C52609D from hkp server p80.pool.sks-keyservers.net gpg: key 2C52609D: public key "Docker Release Tool (releasedocker)" imported gpg: Total number processed: 1 gpg: imported: 1 (RSA: 1)
You should see output similar to following:
docker-engine:
  Installed: (none)
  Candidate: 1.13.0-0~ubuntu-xenial
  Version table:
     1.13.0-0~ubuntu-xenial 500
        500 https://apt.dockerproject.org/repo ubuntu-xenial/main amd64 Packages
     1.12.6-0~ubuntu-xenial 500
        500 https://apt.dockerproject.org/repo ubuntu-xenial/main amd64 Packages
     1.12.5-0~ubuntu-xenial 500
        500 https://apt.dockerproject.org/repo ubuntu-xenial/main amd64 Packages
     1.12.4-0~ubuntu-xenial 500
        500 https://apt.dockerproject.org/repo ubuntu-xenial/main amd64 Packages
     1.12.3-0~xenial 500
        500 https://apt.dockerproject.org/repo ubuntu-xenial/main amd64 Packages
     1.12.2-0~xenial 500
        500 https://apt.dockerproject.org/repo ubuntu-xenial/main amd64 Packages
     1.12.1-0~xenial 500
        500 https://apt.dockerproject.org/repo ubuntu-xenial/main amd64 Packages
     1.12.0-0~xenial 500
        500 https://apt.dockerproject.org/repo ubuntu-xenial/main amd64 Packages
     1.11.2-0~xenial 500
        500 https://apt.dockerproject.org/repo ubuntu-xenial/main amd64 Packages
     1.11.1-0~xenial 500
        500 https://apt.dockerproject.org/repo ubuntu-xenial/main amd64 Packages
     1.11.0-0~xenial 500
        500 https://apt.dockerproject.org/repo ubuntu-xenial/main amd64 Packages
$ sudo apt-get install -y docker-engine
Docker should now be installed. Verify the installation by checking if the docker daemon is running:
The outpout should be similar to the following:
docker.service - Docker Application Container Engine
   Loaded: loaded (/lib/systemd/system/docker.service; enabled; vendor preset: enabled)
   Active: active (running) since Tue 2017-02-07 21:13:41 UTC; 1min 38s ago
     Docs: https://docs.docker.com
 Main PID: 2286 (dockerd)
Client:
 Version:      1.13.0
 API version:  1.25
 Go version:   go1.7.3
 Git commit:   49bf474
 Built:        Tue Jan 17 09:58:26 2017
 OS/Arch:      linux/amd64

Server:
 Version:      1.13.0
 API version:  1.25 (minimum version 1.12)
 Go version:   go1.7.3
 Git commit:   49bf474
 Built:        Tue Jan 17 09:58:26 2017
 OS/Arch:      linux/amd64
 Experimental: false
OK - network-db is running. IP: 172.17.0.2, StartedAt: 2017-02-07T21:28:33.087848567Z
You can start the network server app using the following command:
java -Dspring.profiles.active=dev -Ddb.server=172.17.0.2 -jar ./target/network-server.jar
or use your favorite IDE to develop and run
Step 4: Associate a Domain Name with the AWS Server
In this section, you will associate a domain name, through the Domain Name System (DNS), to a currently running EC2 instance. You must be the legal owner of the domain name you intend to use for the network server and have access to the registrar so that you can update the domain record to point to the new AWS server instance. The domain name is used in web browser's to locate a particular resource. For example, a domain name "edex.phoenix.edu" would allow users to access the EdExchange network server on the internet using https://edex.phoenix.edu. The remainder of this section provides instructions on how to configure the domain name to point to the new AWS server using Amazon's Route 53 registrar. In case you haven't registered a domain name yet, the first step covers the registration process. If you choose to use Amazon's Route 53 registrar, you can check for domain name availablility on the Route 53 dashboard. You can optionally use any other registrar of your choice. For a list of accredited registrars, go to the Registrar Directory. If you choose a different registrar for your domain name, the steps to associate the domain name with the AWS server will be dependent on the registrars process. You can optionally transfer the domain name from your registrar to Amazon's Route 53. You can access the Route 53 dashboard by selecting "Services/Route 53" from the main AWS dashboard.
If you own a domain name registered through a registrar other than Amazon's Route 53, you'll have to follow the instructions specific to the registrar for associating the domain name with your AWS server instance. You can optionally choose to transfer the domain name from your current registrar to Amazon's Route 53 registrar and continue following this guide. At a minimum, you will need to get the IP address for the Amazon EC2 instance. This is the same IP address that was created in the Assign a Static IP Address.
If you don't own a domain name yet for use with EdExchange, you may purchase the domain name through Amazon's domain name service, Route 53.
To use Route 53, make sure you are currently logged into Amazon and then click here to open the Route 53 console in a new window (Route 53 is AWS’s DNS service). You can register new domain names with Route 53 as well as manage DNS records for your domain.
Enter the desired domain name into the input box and select "Check". If the domain is available, you can add the domain name to your Amazon cart. In the next step, fill out the required information and purchase the domain name. Once you purchase the domain, it will take a few minutes for the domain name to become active. When it becomes active, you should receive an alert on the Route 53 Dashboard that indicates the domain registration was successful. You should also receive an email with the same information, sent to the email address you provided during the domain name registration process.
- Sign in to the AWS Management Console and open the Amazon EC2 console at https://console.aws.amazon.com/ec2/.
- In the regions list in the upper right corner of the console, choose the region that you launched the instance in.
- In the navigation pane, choose Instances.
- In the table, choose the instance that you want to route traffic to.
- In the bottom pane, on the Description tab, get the value of Elastic IPs. If you didn't associate an Elastic IP with the instance, get the value of Public IP.
The official Amazon documentation for associating your domain name with your running server instance can be found here. The remainder of this section describes how to associate the IP address with your instance.
- Open the Amazon Route 53 console at https://console.aws.amazon.com/route53/. In the navigation pane, choose Hosted Zones.
- Choose the name of the hosted zone for the domain name that you want to use to route traffic to your EC2 instance.
- Choose Create Record Set.
- Specify the following values:
- Name
- Type the domain name that you want to use to route traffic to your EC2 instance. The default value is the name of the hosted zone. For example, if the name of the hosted zone is example.com and you want to use acme.example.com to route traffic to your EC2 instance, type acme.
- Type
- Choose A – IPv4 address.
- Alias
- Choose No.
- TTL (Seconds)
- Accept the default value of 300.
- Value
- Type the IP address that you got in Get the IP address for the Amazon EC2 instance.
- Routing Policy
- Accept the default value, Simple.
- Choose Create. Changes generally propagate to all Amazon Route 53 servers in a couple of minutes. In rare circumstances, propagation can take up to 30 minutes. When propagation is done, you'll be able to route traffic to your EC2 instance by using the name of the resource record set that you created in this procedure.
Step 5: Configure the EdExchange Network Server
- Sign in to the AWS Management Console and open the Amazon EC2 console at https://console.aws.amazon.com/ec2/.
- In the regions list in the upper right corner of the console, choose the region that you launched the instance in.
- In the navigation pane, choose Running Instances.
- In the table, choose the instance that you created for EdExchange.
- In the bottom pane, on the Description tab, select/click the link for the security group next to Security groups. The security group configuration options will be in the bottom pane.
- Select the Inbound tab and then Edit and then Add Rule from the popup dialog.
- Select HTTPS from the drop down list and then Save
Step 5a: Create an SSL Certificate for the Network Server
In this section, you'll be using the letsencrypt client to create an SSL certicate that will be used to secure HTTPS traffic for your EdExchange network server. If you already have an SSL certificate for your domain, or you wish to purchase one through a certificate authority, you may skip this section. To begin, make sure you're logged into the AWS server instance. From the command line, invoke the following commands:
The letsencrypt client should now be ready to use.
Next, run letsencrypt and pass in your domain name, and an email address. If you lose your account credentials, you can recover through e-mails sent to the provided email address. In the example command below, the domain name is "www.example.com"
$ sudo letsencrypt -d www.example.com --email jwhetstone@ccctechcenter.org
In the dialog that is presented, select Secure Make all requests redirect to secure HTTPS access. and then OK.
Upon completion, you should be presented with a popup dialog similar to the one below:
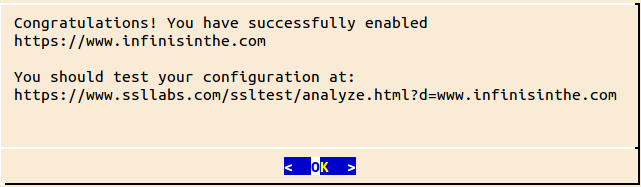
You should see output from letsencrypt similar to the following:
IMPORTANT NOTES:
 - Congratulations! Your certificate and chain have been saved at
   /etc/letsencrypt/live/www.example.com/fullchain.pem. Your cert
   will expire on 2017-05-10. To obtain a new version of the
   certificate in the future, simply run Let's Encrypt again.
 - If you like Let's Encrypt, please consider supporting our work by:

   Donating to ISRG / Let's Encrypt:   https://letsencrypt.org/donate
   Donating to EFF:                    https://eff.org/donate-le
Invoke the commands below and when prompted, input a password. Note the password you use for future use. When the command completes, a new file keystore.p12 will exist in the current directory. Note that in the example command below, you'll need to replace "www.example.com" with your actual domain name.
Step 5b: Create an SSL Certificate for Signing Documents
Step 5c: Upload the Network Server SSL Certificate
One of the requirements to receive documents throught the EdExchange network, is that the EdExchange directory server must have the network servers SSL certificate. The directory server uses the certificate to verify that endpoint URLs are hosted by the server specified in the SSL certificate. So in the step, you will be uploading your PEM encoded network certificate to the directory server.
- From the /home/ubuntu directory of your AWS server instance, extract the PEM encoded certificate from the keystore created earlier:
$ openssl pkcs12 -in keystore.p12 -clcerts -nokeys -out network_certificate.pem
- Open a web browser on your computer and login to the directory server at https:/edex-directory-open-pilot.ccctechcenter.org and select "My Organization" from the menu.
-
Copy and paste the contents of the network_certificate.pem (found in /home/ubuntu on the AWS server instance) to the "Network Certificate" input field in the "My Organizatation" page of the
directory server application.
- From the /home/ubuntu directory of the AWS server instance:
$ cat network_certificate.pem
-
The output should be similar to following which you should cut and paste into the "Network Certificate" field including the ----BEGIN CERTIFICATE---- and ----END CERTIFICATE-----:
-----BEGIN CERTIFICATE-----
MIIFDDCCA/SgAwIBAgISA6JlLdJYmZ9++zUxaKBjyKdfMA0GCSqGSIb3DQEBCwUA
MEoxCzAJBgNVBAYTAlVTMRYwFAYDVQQKEw1MZXQncyBFbmNyeXB0MSMwIQYDVQQD
ExpMZXQncyBFbmNyeXB0IEF1dGhvcml0eSBYMzAeFw0xNzAyMDkwMjA0MDBaFw0x
NzA1MTAwMjA0MDBaMB8xHTAbBgNVBAMTFHd3dy5pbmZpbmlzaW50aGUuY29tMIIB
IjANBgkqhkiG9w0BAQEFAAOCAQ8AMIIBCgKCAQEArEBKo0jsHvA96TKhJdkosVbn
NQ1oZl3OX32geI7ooDVL6y+NmlMHwTJCB8Dd/hF/9DHTTBn0D+macfbT1RAtbVts
1l583pdS4ido5G8cP4escnXdllCm0OmsgJA98nPDBl6uJAb4Og51Fnz6fMe9YZst
x8QX/SlRiDQ9IjrPN1JL3l5lbwA23Vunu9E+mC3nuAV4fWNhoCK5pgBqlPaKnz+S
g+h14iJuygkuSq6KA/onZX8I8J6PX8iZ0ItXUti15RuakIKNRCzToA/d5ovpXRmg
WHNmOkVaUr2baCwQ6xStPCBt1T3Sfq2N3iaf55lU4sThw8dj6t6Kz3h/JOR0JwID
AQABo4ICFTCCAhEwDgYDVR0PAQH/BAQDAgWgMB0GA1UdJQQWMBQGCCsGAQUFBwMB
BggrBgEFBQcDAjAMBgNVHRMBAf8EAjAAMB0GA1UdDgQWBBSJruVS5/bY3JsOD4Of
3zvXsX6n9TAfBgNVHSMEGDAWgBSoSmpjBH3duubRObemRWXv86jsoTBwBggrBgEF
BQcBAQRkMGIwLwYIKwYBBQUHMAGGI2h0dHA6Ly9vY3NwLmludC14My5sZXRzZW5j
cnlwdC5vcmcvMC8GCCsGAQUFBzAChiNodHRwOi8vY2VydC5pbnQteDMubGV0c2Vu
Y3J5cHQub3JnLzAfBgNVHREEGDAWghR3d3cuaW5maW5pc2ludGhlLmNvbTCB/gYD
VR0gBIH2MIHzMAgGBmeBDAECATCB5gYLKwYBBAGC3xMBAQEwgdYwJgYIKwYBBQUH
AgEWGmh0dHA6Ly9jcHMubGV0c2VuY3J5cHQub3JnMIGrBggrBgEFBQcCAjCBngyB
m1RoaXMgQ2VydGlmaWNhdGUgbWF5IG9ubHkgYmUgcmVsaWVkIHVwb24gYnkgUmVs
eWluZyBQYXJ0aWVzIGFuZCBvbmx5IGluIGFjY29yZGFuY2Ugd2l0aCB0aGUgQ2Vy
dGlmaWNhdGUgUG9saWN5IGZvdW5kIGF0IGh0dHBzOi8vbGV0c2VuY3J5cHQub3Jn
L3JlcG9zaXRvcnkvMA0GCSqGSIb3DQEBCwUAA4IBAQCNQoPxmWCTIi0u2qnSBEbr
yFgYaynmPrXB+g0bRCVRrAXPgic8VliS5cYOXSK454Rm060HWPtn8jmnki3RGwLc
sQrqMTmRU/wW0pWoMxUArbHbqscyFYQIOiLhrrvwej6wSARidif1Iz1RplnGe/+F
yPyQKczPTah1UQhozt9aXI+u6JD5MMBYJWIYHQYqL4ZZnyYKrx97BNfsJhiuC9tc
cPUNMwgESu4PU+3M9n3mwq0poGHmhXuH0v6aY9tJKTO1xIupHaPjTz5GlqEF2+Vc
uOsK1KC+somcZPjBg3T9Nnf6esa6AXAb5GfjXujHim+SM3TaAwEr/JNMW2wc9J7M
-----END CERTIFICATE-----
- From the /home/ubuntu directory of the AWS server instance:
Step 5d: Upload the Signing Certificate
One of the requirements to receive documents throught the EdExchange network, is that the EdExchange directory server must have the SSL certificate used to verify the digital signature of a received document. When a network server receives a document from a member, the signing certificate is retrieved from the directory server and the digital sigature is verified using the public key portion of the certificate.
- Open a web browser on your computer and login to the directory server at https:/edex-directory-open-pilot.ccctechcenter.org and select "My Organization" from the menu.
-
Copy and paste the contents of the signing_certificate.pem (found in /home/ubuntu on the AWS server instance) to the "Signing Certificate" input field in the "My Organizatation" page of the
directory server application.
- From the /home/ubuntu directory of the AWS server instance:
$ cat signing_certificate.pem
-
The output should be similar to following which you should cut and paste into the "Signing Certificate" field including the ----BEGIN CERTIFICATE---- and ----END CERTIFICATE-----:
-----BEGIN CERTIFICATE-----
MIIENzCCAx+gAwIBAgIJAIxcHY01lbEuMA0GCSqGSIb3DQEBCwUAMIGxMQswCQYD
VQQGEwJVUzETMBEGA1UECAwKQ2FsaWZvcm5pYTETMBEGA1UEBwwKU2FjcmFtZW50
bzEcMBoGA1UECgwTRGF0YSBieSBUb3VjaCwgSW5jLjETMBEGA1UECwwKRWRFeGNo
YW5nZTEYMBYGA1UEAwwPSmFtZXMgV2hldHN0b25lMSswKQYJKoZIhvcNAQkBFhxq
d2hldHN0b25lQGNjY3RlY2hjZW50ZXIub3JnMB4XDTE3MDIwOTE2NTU1NVoXDTI3
MDIwNzE2NTU1NVowgbExCzAJBgNVBAYTAlVTMRMwEQYDVQQIDApDYWxpZm9ybmlh
MRMwEQYDVQQHDApTYWNyYW1lbnRvMRwwGgYDVQQKDBNEYXRhIGJ5IFRvdWNoLCBJ
bmMuMRMwEQYDVQQLDApFZEV4Y2hhbmdlMRgwFgYDVQQDDA9KYW1lcyBXaGV0c3Rv
bmUxKzApBgkqhkiG9w0BCQEWHGp3aGV0c3RvbmVAY2NjdGVjaGNlbnRlci5vcmcw
ggEiMA0GCSqGSIb3DQEBAQUAA4IBDwAwggEKAoIBAQDOncxgFiM8mqDqtwgg5dan
VOnOlCDbHYHNryFtKUeMkwK2wk0SBKAJBneltOUr+Te3lXxaqP6pLJenAMhufwar
PFEb3POB+wZGBO4x+gzB6u0dHXe+R9gk1Pj+Bfro8da0S4StmgN+BkPbxSwDRYf1
10AD1viH6ozWmEMcf3KMTIYMjZq1GbmRrigl+UvAvkkHbMgeKSKMObXRL20lpniR
kpyKNEWJalMwlL64obP6FfqgqOqsxNCCiva2cRrEYQS7I5N78QcJga7oDSsMjlRf
8SqkeOJU0T3Pk/IwDIGVu5tFFHLyplb3OY6Pxjk71jMekNA/3QCk4TDjHUa3N/7H
AgMBAAGjUDBOMB0GA1UdDgQWBBQHLyuqZ8Aw2KNEWIxSlpCmn5uerTAfBgNVHSME
GDAWgBQHLyuqZ8Aw2KNEWIxSlpCmn5uerTAMBgNVHRMEBTADAQH/MA0GCSqGSIb3
DQEBCwUAA4IBAQAFxRyUNBAdFxI76sg0OLOgg41NrQsH6wqZ7Y4j4FrDeNEiOy0R
lTj14+fXz3qIxv3NUTmIsNMW+Y3rmbLZLQzdRstd4rsucz1hPM85HYU/h8Sl8TAh
9oKUjDgbNvmmDcQKCs1VaPWVFz36HXPLnOzrJwgrSMdBxa0Rd3U1h1J2P2d9NTYB
4wcBLyXb4tnJzWZVxIuoOqS2wEJgR17pekpNwzvHV8aae3deDqrGFEgoQrbKtGI6
4KHN+GaZccfSPWobmj6lOrzs23vzsZLBgjx+bqWK4k2nOSB7OuDlTsZz2/Gj37uJ
UefzAZM0VN/hj/4DZUwELgqNxDHlSeKKEOyc
-----END CERTIFICATE-----
- From the /home/ubuntu directory of the AWS server instance:
Step 5e: Set the OAuth Secret
OAuth 2.0 is used by the reference implementation of the network server to authenticate and authorize HTTP requests related to document upload and acknowledgements. This section describes how to configure OAuth 2.0
- Open a web browser on your computer and login to the directory server at https:/edex-directory-open-pilot.ccctechcenter.org and select "My Organization" from the menu.
- In the section titled "OAUTH", select/click the pencil icon.
- In the "Secret" field, enter a passphrase. Note the passphrase and keep it secure. You will need to provide this passphrase to your network server as one of the configuration parameters when start the network server on your AWS instance.
Step 5f: Define an Endpoint for Handling PESC College Transcripts.
By default, the reference implementation of the network server accepts documents at /api/v1/documents/inbox. If your server name is www.example.com, then your fully qualified endpoint URL would be https://www.example.com/api/v1/documents/inbox. To make this endpoint discoverable by entities that wish to send you a document, you must add the URL to your list of endpoints on the directory server. This section describes how to add the necesssary endpoint to the directory server so you can receive a PESC college transcripts.
- Open a web browser on your computer and login to the directory server at https:/edex-directory-open-pilot.ccctechcenter.org and select "My Organization" from the menu.
- In the section titled "Endpoints", select/click the "plus" icon. This should present a web form for inputing information about the endpoint.
- Fill in the entire web form:
- The URL: the server/domain name must match the domain name contained in the network certificate you uploaded earlier in the process. This will be automatically populated. if your domain name is "www.example.com", then the URL should be "https://www.example.com/api/v1/documents/inbox".
- A description of the endpoint. E.g. "PESC College Transcripts"
- Document Format: choose "PESCCML" from the list.
- Document Types: choose "College Transcript" from the list.
- Departments: choose "Administration" from the list.
- Mode: choose "LIVE" from the list.
Step 6: Start the EdExchange Network Server
This section describes how to start the network server hosted on your AWS ubuntu instance.
- Connect to your AWS server instance.
- Verify that you have the following files in the /home/ubuntu (the current users's home directory) directory after you're logged in to the AWS server:
- keystore.p12 You should have created the keystore in Step 5a: Create an SSL Certificate for the Network Server
- keystore.jks You should have created the keystore in Step 5b: Create an SSL Certificate for Signing Documents.
- Verify that you have a directory "cdsWebserver" in the /home/ubuntu (the current user's home directory) directory. This is the GIT repository and location of the network server software that was built in Step 3b: Get the Network Server Software
- Verify that ./cdsWebserver/networkServer/target/network-server.jar exists. This is the compiled network server software that you should have build in Step 3c: Build the Network Server Software
- Create a shell script to start the network server (you can optionally update the appropriate application.properties profile in the source code and rebuild your application):
- nano start-network-server.sh
- Copy and paste the following code into the editor, after providing the properites, providing missing values for the following properties:
- networkServer.id : This is your organization's EdExchange directory ID. Obtain it from the directory server.
- networkServer.name : This is your organization's name. It should be the same as what's on the directory server.
- networkServer.keystore.password : This is the password you used in Step 5b: Create an SSL Certificate for Signing Documents
- networkServer.admin.username : This is the username of the super user account that is used to sign into the network server. Make sure to select a unpredictable username.
- networkServer.admin.password : This is the password of the super user account that is used to sign into the network server. Make sure this is a highly secure password.
- server.ssl.key-store-password : This is the password you used in Step 5a: Create an SSL Certificate for the Network Server
- authentication.oauth.secret : This is the OAuth 2.0 secrete you used in Step 5e: Set the OAuth Secret
#!/bin/bash docker start network-db /home/ubuntu/cdsWebserver/networkServer/target/network-server.jar \ --spring.profiles.active=pilot \ --logging.file="/home/ubuntu/network-server.log" \ --db.server=172.17.0.2 \ --networkServer.id= \ --networkServer.name= \ --networkServer.keystore=/home/ubuntu/keystore.jks \ --networkServer.keystore.password= \ --networkServer.keystore.signing_key_alias=EdExchange \ --networkServer.file.path=/home/ubuntu/documents \ --networkServer.admin.username= \ --networkServer.admin.password= \ --server.ssl.key-store=/home/ubuntu/keystore.p12 \ --server.ssl.key-store-password= \ --authentication.oauth.secret= \ - Close the editor and save the changes. (Ctrl-X) then type 'Y' when prompted.
- chmod +x start-network-server.sh
- sudo chown ubuntu:ubuntu keystore.p12
- mkdir documents This is where documents will be saved.
- sudo iptables -A PREROUTING -t nat -i eth0 -p tcp --dport 80 -j REDIRECT --to-port 9000
- sudo iptables -A PREROUTING -t nat -i eth0 -p tcp --dport 443 -j REDIRECT --to-port 9443
- sudo apt-get install iptables-persistent Respond with "Y" to question prompts. This step makes it so the iptables are persisted across reboots.
- sudo nano /etc/systemd/system/edexchange.service
- Copy and paste the following into the editor.
[Unit] Description = Start the EdExchange network server After = network.target [Service] ExecStart = /home/ubuntu/start-network-server.sh [Install] WantedBy = multi-user.target - Close the editor and save the changes. (Ctrl-X) then type 'Y' when prompted.
- sudo chmod 644 /etc/systemd/system/edexchange.service
- sudo systemctl enable connection.service
- sudo service edexchange start
The network server should now be running. You may test it by opening a browser and navigating to your domain name. E.g. https://www.example.com, where you shoud be presented with the default home page. If for some reason, the home page does not load, you should take a look at the server log, located at /home/ubuntu/network-server.log for any errors that may have occurred.
Step 7: Request a Transcript
This section describes how to request a transcript for a test student named "John Doe" from Butte College. All of the student identifying information is test data, and the generated transcript is test data.
Upon completion of this section, you will have sent a PESC transcript request document to Butte College through the CCC Tech Center, which is the service provider for Butte College. In response, a PESC college transcript for the test student will be sent back, and you will have the opportunity to view the transcript and information about the transaction.
- Sign into your network server using the admin username and password you configured in Step 6: Start the EdExchange Network Server
- Select "Request Transcript" from the top level menu.
- Fill in all of the form fields as follows: