How it Works
EdExchange is network of servers with two different kinds of servers. The Directory Server is a central server that maintains a directory EdExchange members and that brokers peer-to-peer communication between the other kinds of EdExchange server---the network servers. Network servers communicate peer-to-peer with each other to exchange different kinds of documents.
Not all EdExchange members will host a network server. EdExchange defines two types of members: 1) Institutions and 2) Service providers. When you join EdExchange, you will be asked to specify which type of member your organization will be. To qualify as an Institution, your organization must have the legal status of college or university. A service provider is any organization that intends to send and receive documents for itself or on behalf of other EdExchange organizations. An Institution can also be a Service Provider.
As an Institution, your organization can send documents after proper configuration, but it cannot receive documents. As a Service Provider, your organization can send documents and also receive documents after proper configuration and must host a network server on the internet. Also, an Institution can use one or more Service Provider's to send and receive documents on their behalf (most-likely a fee-based arrangement).
The following table summarizes EdExchange organization types and their capabilities. Note that an organization can be both an Institution AND a Service Provider.
| Organization Type | Send | Receive | Network Server Required | Send/Receive for other organizations |
|---|---|---|---|---|
| Institution | Yes | No | No | No |
| Service Provider | Yes | Yes | Yes | Yes |
The Directory server is hosted and maintained by the PESC organization. It includes a directory of EdExchange members and all their related information. As an EdExchange member you can manage your organization through the Directory server web application UI. You can also manage operations using the hosted API that exposes directory information. The REST API allows you to manage users, endpoints, contacts, and the signing certificate tasks as you would via the Directory server web app. After registering with EdExchange, the next tasks include: configuration, setting up your Network Servers (if you elect to receive documents), making any customizations, and testing. Information to do all of this follows in the sections below.
| Organization Type | Task/Goal |
|---|---|
Service Provider |
|
Institution |
Web Application and API
The EdExchange directory server web application allows non-technical people to sign up and manage much of the configuration. The configuration can also be done programmatically by a developer accessing the API via SOAP or a REST based client. To actually send and receive documents, a developer at your organization will need to work with the reference open-source Network Server and Directory Server code base to meet your needs. The information in this Documentation should provide both non-technical users and developers the information they need about participating in the EdExchange network.
Join the EdExchange Network
There are various ways in which an organization can be added to the EdExchange directory.
New applicants can register by filling out the registration form. The registration automatically creates an administrator account for the individual listed in the registration form as the contact. This account has administrator privileges for the organization. After the form is submitted, the organization's administrator will receive an email notification regarding the registration. At that point, the organization is listed in the EdExchange directory, but disabled. It will remain disabled until a PESC administrator reviews and approves the information that was provided in the registration form. The organization's administrator can conduct normal operations such as setting up the network server and publishing a SSL certificate, while the application is being reviewed.
An orgnanization can also be created directly by an PESC administrator.
Organization's that are institutions can be created by a service provider for the purpose of adding the institution to the provider's group of serviceable institutions. Institutions that are created in this way must also be reviewed and approved by a PESC administrator.
In each case, a PESC administrator is required to review and approve the organization. When a new organization record is created, it is disabled in EdExchange as shown in the directory. Once the PESC administrator approves the organization, it becomes enabled in the EdExchange direcory.Configuration Through the Directory Server
This section is a user guide that describes how an organization's administrator can configure their organization using the directory server web application after logging into the application.
Using the directory server web application is mostly self explanatory. It uses consistent icons to denote actions you can take, such as a "+" icon to add a new item, a disc icon to save an item, etc. Nonetheless, some information about the EdExchange application user interface is presented here for further reference. A menu of options displays across the top of the EdExchange web app. At any point if you want to return to this home screen, click the Ed Exchange text in the top left corner of the screen. Refer to the table below for each menu's usage.
| Menu Name | Description |
|---|---|
| Directory | Displays a directory of all the EdExchange organizations. Click the buttons in the top left to filter the display by Enabled, Service Provider, or Institution. You can also search for a specific organization if you'd like. |
| Docs | Displays documentation for EdExchange in a new browser tab. |
| Settings | Displays accepted document delivery methods, document formats, document types, and departments. |
| My Organization | Displays information about your organization that you provided at registration. You can edit, delete, and save information on this tab, including information about contacts, school codes, Service Providers, signing and network certificates, and serviced schools. |
| Users | Displays the user contact information entered when you registered for EdExchange. You can edit the contact information as well as the type of role. |
| Messages | Displays messages from the PESC organization regarding your registration status. Additional message types are possible in the future. |
Configuring Service Providers for Your Organization
Service Provider are organizations that have registered with EdExchange and as such, have set up a Network Server, and are authorized to receive documents. If you registered with EdExchange as an Institution, then you can send documents but you will need to select a Service Provider in order to receive documents through them. You can also register as a Service Provider to receive documents yourself.
- From My Organization -> Service Providers, click the Edit (Pencil) icon.
- Click the check box for the Service Provider you want to use for receiving documents on your behalf. If your organization is also a Service Provider, you can select your own organization here. Note that in order to display as an available Service Provider your organization must have registered as one and set up/hosted a Network Server.
- Click the Save icon to save your selection.
Configuring Your Signing Certificate
Before you can send a document you must configure a signing certificate. A signing certificate is an SSL certificate specifically created to create digital signatures. An SSL certificate includes the public key portion of a public/private key pair and information about the key and owner. SSL certificates are typically issued by a certificate authority which verifies the identity of your organizatoin. An SSL certificate is required to send and receive documents through the EdExchange network. The authenticity of documents transferred within the EdExchange network is verified using the SSL certificate provided by the sender for the purpose of generating digital signatures. Note: The certificate must be in PEM format.
Note: The Signing Certificate can also be configured programmatically by your organization's developer by updating the API's signing-certificate property on the organization resource.
- Obtain an SSL certificate from a certificate authority. You can follow the instructions here for using a free, self-signing certificate for testing purposes prior to obtaining an SSL certificate from a certificate authority. The certificate must be in PEM format.
-
Once you have the certificate file:
- From My Organization -> Signing Certificate, click the Expand (Pencil) icon.
- Copy the contents of the PEM encoded certificate file and paste it into the Signing Certificate field.
- Click the Save icon to save it. When you add a Signing Certificate your account automatically becomes disabled pending a PESC administrator’s review. You will receive an email notifying you that your organization and its signing certificate are enabled. This is done for security reasons and should take no more than a day to receive.
-
Now that you have provided your certificate to the directory server, you'll need to configure your
network server to use it. There are 2 configuration parameters specified in the application.properties
file that indicate to the network server where to find the private key that corresponds with the
public key in the certificate. The default configuration properties are as follows:
                        networkServer.keystore=/keystore.jks
                        networkServer.keystore.password=password
                        networkServer.keystore.signing_key_alias=test
This means that the reference network server code has be pre-configured to use the private key identifed by the alias "test" in the default keystore "keystore.jks". Once you obtain a valid signing certificate, you'll need to import it into the keystore.jks keystore and update the alias to whatever name you use when you import it. You can use the keytool program that comes with the JDK to manage your keystore and certificates.You can list the entries in the keystore with the following command: keytool -keystore keystore.jks -list If you run this against the default keystore.jks file in the /networkServer/src/main/resources directory, you should see the following output:
Keystore type: JKS Keystore provider: SUN Your keystore contains 1 entry test, May 26, 2016, PrivateKeyEntry, Certificate fingerprint (SHA1): DA:A5:4F:42:EC:44:55:9C:89:1F:77:A6:67:40:52:A3:F5:61:37:93 - After you have your Signing Certificate in place and your organization is enabled, test it by sending a document to the free reference implementation of the Network Server.
Configuring Your Network Certificate (for Service Providers Only)
The Network Certificate section only displays on the My Organizations tab if your organization is a Service Provider (can receive documents). Before an organization can receive a document, it must obtain a certificate from a certificate authority for the purpose of securing the Network Server using HTTPS.
Once you've obtained a certificate for use as your web server's HTTPS certificate, you must import into the keystore using the Java keytool program that comes with the JDK. The default keystore is "keystore.p12" located under
/networkServer/src/main/resources/
You may list the contents of the default keystore with:
keytool -keystore keystore.p12 -storetype PKCS12 -list
Prerequisites:
- You must register as Service Provider with EdExchange.
- Work with your software developer to set up/host a Network Server. This is required for all EdExchange members who want receive documents.
Follow the same steps as listed in above to obtain and configure a Network Certificate in addition to your Signing Certificate so that you can receive documents.
You can also add/update the Network Certificate programmatically by updating the API's network-certificate property on the organization resource.
Configure Your Serviced Schools (For Service Providers Only)
The Serviced Schools field only displays on the My Organizations tab if you are registered as a Service Provider. The Serviced Schools section is where you identify those schools on whose behalf you receive documents as a Service Provider. EdExchange allows you to upload a CSV file where each row in the file represents an EdExchange Institution (school) and adds it to your group of serviceable institutions. Download the CSV template file here (be sure to retain the file's header). Consult the school codes section for information about code requirements.
You can programmatically add a serviced school by using the API's institution resource to create the institution and then add it to the Service Provider's group of serviceable institutions using the API's relation resource.
You can also use the upload tool in the Directory Server application as follows.
- Select My Organization from the menu, click the Upload (Up Arrow) icon in the Serviced Schools section to display the Institutions Upload dialog box.
- Create a CSV file that includes information for all the schools you service. You can use this template to create a CSV file that you can use to upload the serviceable schools. Be sure to keep the file's header.
- Click Browse to navigate to the .csv file you just created above.
- Click Upload to upload it. If any errors occurred, click the Show history button to display the errors. Click the Success or Errors check boxes to display one or both type of history. If there are any errors, read the reason for the error, correct it in the .csv file and save the file, then try to upload the file again.
- Click OK to close the Institutions Upload dialog box. You may have to refresh the page the serviceable schools display.
Configure Your Endpoints (For Service Providers Only)
You may create endpoints only after your network server SSL certificate has been uploaded to EdExchange.
An endpoint is a URL and set of attributes that identify where to send a document. Organizations that are Service Providers can create, read, update and delete and assign endpoints to Institutions that are serviceable by the provider. An Institution can also be a Service Provider and can receive documents for itself. Endpoint operations can be invoked through the EdExchange web application by an authenticated user with the appropriate permissions or by a developer using the endpoints resource of the REST API.
Work with your software developer to create an endpoint (URL) as well as to associate one or more endpoints with the institution.
- Click the Expand (+) icon to the left of the Endpoints field label to display the Endpoints form fields.
- Enter your dedicated and secure Network Server URL in the https:// field. The server name should be populated automatically based on you network server SSL certificate.
- Enter a description of your service in the Description field.
- Select the document format used by this endpoint from the Document Format drop-down list (PESCXML, XML, Text, PDF, Image, Binary, EDI, Mutually Defined).
- Select the form of delivery service from the Delivery Service drop-down list (Web Service, SFTP, USPS). Note that the reference implementation of the network server only supports "Web Service" at this time.
- Select the document type from the Document Types drop-down list.
- Select a department from the Departments drop-down list.
- Select a mode from the Mode drop-down list. LIVE is selected by default, but you can select TEST instead when testing. Note: Clicking the Hosted By field value, which shows your Service Provider name as a link, displays your Directory listing in EdExchange.
- Click Save.
Manage Users
Manage Users: You can maintain a group of users that can manager your organization on the Users tab in the EdExchange web application, whether you registered as a Service Provider or an Institution. You must be an authenticated EdExchange user with the appropriate permissions (i.e. configured as an Organization Admin). Note: Alternatively, users can be managed via the API's users resource by your organization's developer.
Use the steps below to add users using the EdExchange web application (Directory Server).
- Click the Users menu item and then the "+ User" button that displays under your organization's name to display the new user form.
-
Enter values in the fields provided. Most of the field values are self explanatory, but a few
details that may not be obvious are described further below.
- The "System Administrator" role is relevant to the PESC organization and is disabled by default.
- The "Organization Administrator" role provides access to all the My Organization fields and CAN create new users.
- The "Support Technician" role is relevant to the PESC organization and reserved for future use only.
- The Password for the user must be at least 15 characters long, contain one upper case letter, one lower case letter, one number, and one special characters. If the password entered does not meet these requirements a pop-up message displays when you click Save informing you of them.
- Click Save. If any required fields do not have values, they display as red when you click the Save button. Enter any missing required values and click Save again.
Introduction
The EdExchange API is accessible using SOAP and REST based clients. A WSDL is accessible for each defined resource as shown on the services page. The remainder of the API documentation is specific to the REST API and is intended to supplement the interactive API documentation by providing descriptions of higher level tasks. Tasks are typically composed of different API invocations on various resourcess to accomplish a goal.
The EdExchange REST API has predictable, resource-oriented URLs, and uses HTTP response codes to indicate API errors. We use built-in HTTP features, like HTTP authentication and HTTP verbs, which are understood by off-the-shelf HTTP clients. We support cross-origin resource sharing, allowing you to interact securely with our API from a client-side web application. Depending on the value of the HTTP "Accept" header in each HTTP request, which must be one of "application/json" or "application/xml", JSON or XML is returned by all API responses, including errors.
To make the API as explorable as possible, interactive API documentation has been provided. The interactive API documentation should be the primary source of information regarding API usage. In addition, for the purpose of testing end-to-end document delivery, endpoints can be designated for use in test mode or live mode. There is no "switch" for changing between modes, just use the appropriate endpoint to deliver a live or test document.
Sample Code
EdExchange is an open source project. The source code for both the EdExchange directory server and the network server are available through github. Most of the API operations that are used by institutions and service providers are implemented in the network server code.
The network server project includes code for the following tasks:
- Receive a document and all the logic that entails, including signature verification.
- Create a transaction to store send/receive information
- Send a document and all that logic that entails including signature generation.
- Create a serviceable institution
- Updating organization information in the directory
It is likely that more sample code in the form of unit tests will be added to the network server project in the future.
Authentication
The EdExchange API
The EdExchange API hosted by the Directory Server uses basic authentication. All API requests must be made over HTTPS. Calls made over plain HTTP will fail. Many API requests require certain permissions for authorization in addition to authentication. In addition, HTTP methods that trigger side effects (e.g. POST, PUT, DELETE) utilize the Double Submit Cookie technique to defend against cross site request forgery.
Network Server Access
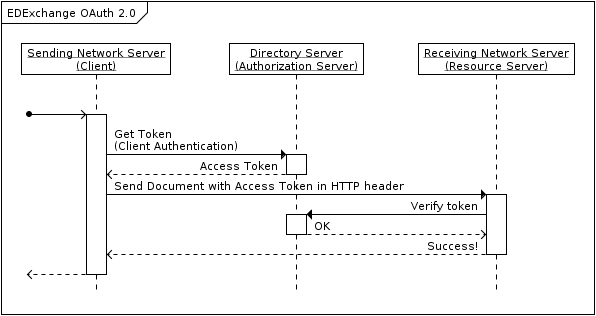
Network server authenticate each other when send and receiving documents using OAuth 2.0.
The reference implementation of the network server utilizes OAuth 2.0 to authorize HTTP requests through
the Directory Server. The
EdExchange implementation of OAuth 2.0 is configured to use the Directory Server as the authorization
server. With this configuration, the sending network server is the OAuth client and the receiving
network server is the OAuth resource server.
Single sign on (SSO) is implemented using OAuth 2.0 and the authorization code grant type. By default, users that are member of organizations that are serviced by an network server can login to the network server using SSO. You may disable the SSO feature by changing the following application property from true (default) to 'false'
edex.sso.enabled=false
Errors
EdExchange uses conventional HTTP response codes to indicate the success or failure of an API request. In general, codes in the 2xx range indicate success, codes in the 4xx range indicate an error that failed given the information provided (e.g., a required parameter was omitted, etc.), and codes in the 5xx range indicate an error with the EdExchange servers (these are rare). Not all errors map cleanly onto HTTP response codes, however. When a request is valid but does not complete successfully, we return a 402 error code. The following describes the components of an error message:
- timestamp
- A time stamp when the error occured, i.e. System.currentTimeMillis().
- exception
- The kind of exception that occurred. This is an optional element.
- status
- The HTTP status code (same as the response status code).
- error
- The HTTP status code description (derived from the response status code).
- path
- The path that was requested.
- message
- A message which elaborates the problem in more detail.
404 is not used. When a resource cannot be found, an empty list is returned.
- 200 - OK
- Everything worked as expected.
- 400 - Bad Request
- The request was unacceptable, often due to missing a required parameter.
- 401 - Unauthorized
- Invalid or missing credentials.
- 402 - Request Failed
- The parameters were valid but the request failed.
- 403 - Access Denied
- Invalid credentials or inadequate permissions.
- 409 - Conflict
- The request conflicts with another request (perhaps due to using the same idempotent key).
- 429 - Too Many Requests
- Too many requests hit the API too quickly.
- 500, 502, 503, 504 - Server Errors
- Something went wrong on internal to the EdExchange directory server. (These are rare.)
        {
            "timestamp": 1465942251599,
            "status": 403,
            "error": "Forbidden",
            "message": "Access is denied",
            "path": "/services/rest/v1/organizations/3"
        }
        {
          "timestamp": 1465992374617,
          "status": 400,
          "error": "Bad Request",
          "exception": "java.lang.IllegalArgumentException",
          "message": "At least one organization ID or school code parameter is mandatory.",
          "path": "/services/rest/v1/endpoints"
        }
        {
            "timestamp": 1470845258256,
            "status": 403,
            "error": "Forbidden",
            "message": "Missing or non-matching CSRF-token",
            "path": "/services/rest/v1/organizations/2/enabled"
        }
Pagination
Certain resources that have large results sets can be paginated. Whenever pagination is available, EdExchange utilizes two query parameters limit and offset to specify the maximum number of records that should be returned, and where in the result set to start. EdExchange utilizes a custom HTTP header X-Total-Count in the response to indicate the total number of records in the result set.
https://edex-directory-open-pilot.ccctechcenter.org:443/services/rest/v1/organizations?limit=5&offset=0
     {
      "pragma": "no-cache",
      "strict-transport-security": "max-age=31536000 ; includeSubDomains",
      "x-content-type-options": "nosniff",
      "server": "Apache-Coyote/1.1",
      "date": "Wed, 15 Jun 2016 12:55:29 GMT",
      "x-frame-options": "DENY",
      "content-type": "application/json;charset=UTF-8",
      "x-total-count": "5150",
      "cache-control": "private, no-cache, no-store, max-age=0, must-revalidate",
      "transfer-encoding": "chunked",
      "x-xss-protection": "1; mode=block",
      "x-application-context": "application:dev:8443",
      "expires": "Wed, 31 Dec 1969 16:00:00 PST, 0"
    }
Cross Site Request Forgery
Cross-site request forgery, also known as one-click attack or session riding and abbreviated as CSRF (sometimes pronounced sea-surf) or XSRF, is a type of malicious exploit of a website where unauthorized commands are transmitted from a user that the website trusts.
The Directory Server utilizes a method of CSRF protection called double submit cookie which requires client side generated CSRF tokens. With this technique, clients must generate and send the same unique secret value in both a cookie and a custom HTTP header. Because a website is only allowed to read/write a cookie for its own domain, only the real site can send the same value in both headers.
For applications that are consuming the REST API directly with technology such as Spring's RestTemplate, the developer must generate a secret, for example "4a0e4a27220ceca2cfdaa7a338087a07e5" and include it in both the custom HTTP header X-CSRF-TOKEN and the Cookie header. Example HTTP response headers are shown below (note the X-CSRF-TOKEN header and the Cookie headers).
        Accept:application/json
        Accept-Encoding:gzip, deflate, sdch, br
        Accept-Language:en-US,en;q=0.8
        Authorization:Basic YWRtaW46YWRtaW4=
        Connection:keep-alive
        Content-Length:4
        Content-Type:application/json
        Cookie:CSRF-TOKEN=4a0e4a27220ceca2cfdaa7a338087a07e5; JSESSIONID=5226801215CA5DB09FD1A25739232574
        Host:localhost:8443
        Origin:https://localhost:8443
        Referer:https://localhost:8443/swagger-ui/index.html
        User-Agent:Mozilla/5.0 (X11; Linux x86_64) AppleWebKit/537.36 (KHTML, like Gecko) Chrome/52.0.2743.116 Safari/537.36
        X-CSRF-TOKEN:4a0e4a27220ceca2cfdaa7a338087a07e5
HTTP requests that do not pass CSRF checks will fail and the server will return a 403 status code such as following:
        {
            "timestamp": 1470845258256,
            "status": 403,
            "error": "Forbidden",
            "message": "Missing or non-matching CSRF-token",
            "path": "/services/rest/v1/organizations/2/enabled"
        }
Code examples in Java are provided as part of the directory server unit tests using Spring's RestTemplate.
Directory Server
The EdExchange directory server maintains a directory of EdExchange members and all relateded information. This is the server that hosts the API and exposes the directory information. It is hosted and maintained by the PESC organization. EdExchange members can also manage their organization through the directory server web application. Operations can be conducted using the REST API, including the management of users, endpoints, contacts and the signing certificate, and in many cases, through the directory server web application by an authenticated user with the appropriate permissions.
Network Server
The EdExchange network server is a server that hosts endpoints (a URL that can that receives documents). A network server must exist for each EdExchange member that is configured to receive documents.
- Built in single sign on (SSO) using OAuth 2.0, where the directory server is the identity/authorization server.
- Sender verification using OAuth tokens---when a network server receives a document, it verifies the sender is a valid EdExchange member before processing the document.
- Document verification using public key infrastructure---the receiver obtains the sender's public key from the directory server and verifies the document's signature.
- Transaction reporting.
https://github.com/jhwhetstone/cdsWebserver.git
The project contains the source code for both the directory server and the reference implementation of the network server, so that a directory server can be run locally for testing purposes. The network server is a complete solution in that it can securely send and receive documents over the EdExchange network. Even so, many institutions will want to customize certain parts of the implementation.
If an EdExchange member chooses to use the reference implementation of the network server, there are certain tasks that need to be performed to make the reference implementation live for the member. The network server is implemented as a Spring Boot application and requires Java 8 to run and maven to build. It also requires a database. Depending on what deployment options you choose, you will most likely need docker. There are multiple options with regards to how to deploy and run the network server that are useful for different purposes.
The network server application is configured using the application.properties files. There are 3 configuration profiles:
- dev: Intended for use in a development environment
- qa: Intended for use in a quality assurance environment
- prod: Intended for use in a production environment
You can specify the configuratio profile on the command line, when invoking the application:
This option uses docker and docker-compose to create separate VM images for the network server application and the database. When you've completed the steps to use this option, you should be able to use a browser open to the network server running in a docker VM. The IP address of the network server will depend on your docker configuration, but typically, http://172.17.0.3:9000 will work.
-
First, build the network server...
From the network server directory (cdsWebserver/networkServer), run
mvn clean install
-
Next, run the docker containers...
From the network server directory (cdsWebserver/networkServer), run
docker-compose up
In addition, it may be desirable to run a the directory server locally, in which case there is a similar process for running the directory server
-
First, build the directory server...
From the directory server project folder (cdsWebserver/directoryServer), run
mvn clean install
-
Next, run the docker containers...
From the directory server project folder (cdsWebserver/directoryServer), run
docker-compose up
Another docker compose option is to invoke "setup.sh" from the project root "cdsWebserver". This script automates the build process for both the directory and network servers by building the projects, creating docker images and then running a the directory server and network server and their respective database images with docker containers. Invoke the setup.sh script with the name of the dev profile:
./setup.sh dev
As the setup.sh script runs, it will output status of the build process. When it completes, you should see console output similar to following (IP addresses and hostnames may vary):
                WARNING: The MAIL_SMTP_HOST variable is not set. Defaulting to a blank string.
                WARNING: The MAIL_SMTP_USERNAME variable is not set. Defaulting to a blank string.
                WARNING: The MAIL_SMTP_PASSWORD variable is not set. Defaulting to a blank string.
                Recreating network-db
                Creating dir-db
                Creating directory-app
                Creating network-app
                Error: No such image or container: network-db
                Error: No such image or container: network-db
                OK - network-db is running. Internal IP: , StartedAt:
                OK - network-app is running. Internal IP: 172.17.0.5, StartedAt: 2017-02-05T17:20:03.108125026Z
                OK - directory-db is running. Internal IP: , StartedAt: 2017-02-05T16:50:55.528364971Z
                OK - directory-app is running. Internal IP: 172.17.0.4, StartedAt: 2017-02-05T17:20:02.803220165Z
                Ed Exchange servers can be accessed with the following URLs:
                Network server   -- http://hostname:8081/home
                Directory server -- http://hostname:8080/home
Note that the WARNING output regarding the missing environment variables indicates that the automated mail service within the directory service will not operate correctly unless the specified variables are set to valid values.
The setup.sh is paired with shutdown.sh which should be used to stop the running docker containers.
This option is intended for development. It creates a docker image for the database, and allows the developer to run the network server locally, but using the database image to host the PostgreSQL database.
- From the cdsWebserver/networkServer directory, invoke the dev-setup.sh script from the command line.
When the script completes, you should see output similar to the following:
        OK - network-db is running. IP: 172.17.0.2, StartedAt: 2016-06-21T20:03:07.627885776Z
        You can start the network server app using the following command:
        java -Dspring.profiles.active=dev -Ddb.server=172.17.0.2 -jar ./target/network-server.jar
        or use your favorite IDE to develop and run.
After the network server is started, you can navigate to http://localhost:9000 with a browser.
You can optionally provision servers manually. You will need a Postgres (default) or PostgreSQL database server and a server to run the network server application. You may use the dev-setup.sh script as a reference for provisioning your servers and running the EdExchange network application.
- Obtain a domain name for the network server. This will be the base address for endpoints hosted by the network server.
- Obtain and install an SSL certificate for the purpose of handling the HTTPS protocol for the chosen domain name. The network server project implements HTTPS, but you can alternatively use a proxy server or other configuration appropriate to your organization. HTTPS configuration and proxy is outside the scope of this document.
- Configure a database server of use with the network server.
- Update the application-prod.properties to reflect your environment.
Organizations
An organization is an object that represents a member of the EdExchange network. There are two types of organizations in the EdExchange network that have different capabilities within the network: service providers and institutions. An organization can be of type Service Provider or Institution or both. When an organization is created, a number is assigned to it that uniquely idenifies the organization in the EdExchange network. All members of the EdExchange network are included in the searchable EdExchange directory. Operations on an organization object can be invoked using the organizations resource of the REST API or through the directory server web application by an authenticated user with the appropriate permissions.
An organization that is a Service Provider can both send and receive documents through EdExchange, for itself and on the behalf of organizations that are institutions. For an organization to be able to receive documents, the organization must host an EdExchange network server.
An organization that is an Institution can send documents through EdExchange. To send documents, the organization must publish a SSL certificate, obtained from a certificate authority, to the directory server. The certificate is used to verify the authenticity of a document transferred through EdExchange using digital signatures.
Endpoints
An endpoint is a URL and set of attributes that identify where to send a document. Organizations that are Servcice Providers can create, read, update and delete and assign endpoints to institutions that are serviceable by the provider. An institution can also be a service provider and can receive documents for itself. Endpoint operations can be invoked through the web application by an authenticated user with the appropriate permissions or by using the endpoints resource of the REST API.
The reference implementation of the network server uses a multipart/form-data HTTP POST as the endpoint that receives documents as defined below.
Frequently Asked Questions (FAQ)
Q: My institution wants to send transcripts to a particular school, what do I need to do?
A: First, register with EdExchange as an institution (as opposed to a service provider). If you also want to be able to receive documents, you must register as an institution and a service provider. Consult the next FAQ below for more information about receiving documents.
Next, check if the destination school is an EdExchange member using the searchable directory. If the school isn't an EdExchange member, they need to register as a member. Also, the destination school needs to be configured to receive documents. The destination school must either configure a network server, using the reference implementation that's provided by EdExchange, or alternatively, use an EdExchange service provider to receive documents on their behalf. Service providers are listed in the searchable directory.
After you've registered your institution, you'll need to obtain an SSL certificate from a certificate authority and upload it to the directory server. Once you have your certificate with the corresponding private key, you can use either the free reference implementation of the network server to send a document. Optionally, you'll need a software developer to extend or implement a customized software program.
Q: My institution wants to receive transcripts through EdExchange, what do I need to do?
A: . First, you must register with EdExchange as both an institution and a provider. As a service provider, your institution will be able both send and receive documents.
After you have been registered and are a member of the EdExchange network, your are required to host a network server on the internet using a domain name of your choosing (E.g. edexchange.butte.edu). A free reference implementation of the network server can be used. Optionally the reference implementation can be extended by a software developer to add or customize features, but the reference network server has the ability to both send and receive documents. If your institution intends to send documents, you'll have to provide an SSL certificate and install the corresponding private key so that is accessible to the network server. Other configuration changes to the reference implementation of the network server are required too, such as the installation of a second SSL certificate used to encrypt data communications with the network server over the internet using HTTPS. Alternatively, you may configure HTTPS using a load balancer/proxy.
Once your network server has become operational, there are a number of common service provider tasks and common institition tasks that define the system.
Q: My organization is a service provider that has thousands of serviceable institutions. How do I configure EdExchange to send and receive for all of these institutions?
A: . The EdExchange web application and API provides a way for service providers to create institutions and add them to a logical group that represents serviceable institutions.
Service providers upload a CSV, or use the REST API to manage their group of serviceable insitutions.
In order to receive documents of behalf of a serviceable institution, the service provider must assign an endpoint to the institution.
Use Cases
Transfer a Document
- The sender queries the directory server for the directory ID of the recipient institution using various search criteria such as the school's name, ATP code or FICE code.
- The sender queries the directory server to find an endpoint (a URL that identifies where to send a document using HTTP) that fulfills the required criteria including the document type (Transcript or Transcript Request), the file format of the document (PDF, text, XML, etc.), the name of the institution's department to deliver to and the directory ID of the recipient insitution.
- The sender digitally signs the document with a private key that is paired with the SSL certificate's public key supplied to the directory server.
- The sender optionally creates a transaction used to track the document transfer.
- The sender sends a document to the endpoint using HTTPS along with the document's digital signature, the sender's directory ID, the recipient's directory ID, the file format, the document type and destination department name and optionally, a transaction id and acknowledegment URL.
- The receiving network server queries the directory server for the sender's signing certificate and verifies the digital signature of the document.
- The receiving network server handles the document appropriately (E.g. delivers a transcript to the recipient, send back a transcript in response to a transcript request) based on the recipient ID, the document type etc.
- The receiving network server creates a transaction to log the event.
- The receiving network server sends an acknowledgement back to the sender using the acknowledgement URL and transaction ID provided by the sender (if present).
- The sender's network server updates the transaction with the acknowledgement.
Publish a SSL Certificate
An SSL certificate is required to send and receive documents through the EdExchange network. The authenticity of documents tranferred within the EdExchange network is verified using the SSL certificate provided by the sender for the purpose of generating digital signatures.
Before an organization can send a document, it must obtain a certificate from a certficate authority and upload the certificate to the EdExchange directory server using the website or by updating the signing-certificate property on the organization resource of the REST API.
Before an organization can receive a document, it must obtain a certificate from a certficate authority for the purpose of securing the network server using HTTPS, and upload the certificate to the EdExchange directory server using the website or by updating the network-certificate property on the organization resource of the REST API.
- Obtain an SSL certificate from a certificate authority, or optionally, for test purposes, create a self signed certificate.
- Upload the signing certificate to the directory servier using the website, or by updating the signing-certificate property on the organization resource of the REST API. The certificate must be PEM encoded.
- Upload the network certificate to the directory servier using the website, or by updating the network-certificate property on the organization resource of the REST API. The certificate must be PEM encoded.
A self signed SSL certificate can be created with the openssl command line utility using the following command:
openssl req -x509 -newkey rsa:2048 -keyout key.pem -out certificate.pem -days 365
The resulting "certificate.pem" file contains the PEM encoded certificate which must be uploaded to the EdExchange directory server.
        -----BEGIN CERTIFICATE-----
        MIIEMTCCAxmgAwIBAgIJAODgvtVzzhWlMA0GCSqGSIb3DQEBCwUAMIGuMQswCQYD
        VQQGEwJVUzETMBEGA1UECAwKQ2FsaWZvcm5pYTERMA8GA1UEBwwIT3JvdmlsbGUx
        FjAUBgNVBAoMDUJ1dHRlIENvbGxlZ2UxGDAWBgNVBAsMD0NDQyBUZWNoIENlbnRl
        cjEYMBYGA1UEAwwPSmFtZXMgV2hldHN0b25lMSswKQYJKoZIhvcNAQkBFhxqd2hl
        dHN0b25lQGNjY3RlY2hjZW50ZXIub3JnMB4XDTE2MDYwMzEzMzIzM1oXDTI2MDYw
        MTEzMzIzM1owga4xCzAJBgNVBAYTAlVTMRMwEQYDVQQIDApDYWxpZm9ybmlhMREw
        DwYDVQQHDAhPcm92aWxsZTEWMBQGA1UECgwNQnV0dGUgQ29sbGVnZTEYMBYGA1UE
        CwwPQ0NDIFRlY2ggQ2VudGVyMRgwFgYDVQQDDA9KYW1lcyBXaGV0c3RvbmUxKzAp
        BgkqhkiG9w0BCQEWHGp3aGV0c3RvbmVAY2NjdGVjaGNlbnRlci5vcmcwggEiMA0G
        CSqGSIb3DQEBAQUAA4IBDwAwggEKAoIBAQDBiM6gvvogXLxRtO+uMk8nqcwnQfxX
        TSGoUMlvEs2GFocB2C67BxQ++qxf3Lpn4N/ZrutClreJ403INHph1WbkhtHIZrtn
        4yZ+kAtnQIcAYicoxAtxW9NuupD335RIIYkjkjiy11Aw6/+TfJYASEB38Vg3yaEo
        3pmpqQUt84AQ/r3NrouMeFNVDnyKGz6mCAUyRqYxL3YjLrd1EhQSX6cEksGLFYmf
        9hscrTUWaQu4u8VBJ8xx9GvRp9G0zM8/7i0Teit5YWpmKnmsNmHe3XEwyxTc+/s4
        39m+VnrIB2z+lPzvWJYuKz/apSnpoulUZ4nBRsxgKAXH6KIAUTcndc5nAgMBAAGj
        UDBOMB0GA1UdDgQWBBSkaPcNqtNTaC6AWH03rSwoZ7jaSDAfBgNVHSMEGDAWgBSk
        aPcNqtNTaC6AWH03rSwoZ7jaSDAMBgNVHRMEBTADAQH/MA0GCSqGSIb3DQEBCwUA
        A4IBAQBHoW5NnQz7+d5lCihwk6iaP7xAtd/qEWJu+1yZyfqcebwqoadJgb0nC8Uz
        uAMd6EzaynxUv5xheBQRUv3fpLJEe31wmLn0Gd+PpK0m6eNK4oqVawPJzML9nNmS
        JASFKKs1g429zUdQ3oUn30S5VcsXhtE0io61kBwHJPtgapFno9XFqjSRFKDL5qzz
        QyGAhIPBEq5Jl8DNpNh2fI/1UP06Gk1Dd6mu7xh5QN/Sd8tcPHKK6uHc3hpUmt7d
        Tqg8+PzF7+OZj/t456L1zNdmRsZvE+Xu3JSCSQKCWxHT5Uaw09Mf2iipCqojd8B2
        vpU99m48pMDjePnU3qOdCQmsZ8OH
        -----END CERTIFICATE-----
The resulting "key.pem" file contains the private key that will be used to generate the digital signature for any document sent through EdExchange. The private key should not be shared and kept in a secure location.
        -----BEGIN ENCRYPTED PRIVATE KEY-----
        MIIFDjBABgkqhkiG9w0BBQ0wMzAbBgkqhkiG9w0BBQwwDgQIYtnco2loBy4CAggA
        MBQGCCqGSIb3DQMHBAg6xRCn3LZcjQSCBMgV0/6hI2RX3jEZTR5qwNOBBA5TFinL
        SYqYz9b+gbsZc7uZqFnQjDrHtYLAv9dJXvUCCB+EhtgpL7blzWxTHWFuc5QA+20j
        jRhiFglrHDtUvvXdj9o0CT8LadsrRAOSobnSM6UY3kFzMUf7MWDQbukGM36q2uHf
        xAwbJQZ7Ulm89A3abRN3MUYJo1HG2TRKqTeNhTSjAV4G6lRzomf2VhQnzp5NbqYQ
        WNKFwhwV75jdc8Ldgsn7O4y/TEsbfnHFFu/bUSzkvuJ5b/g1RYSKmrGrtbkMsatB
        nPGValF3dmMmQ9J7qL2xw9dye8TWuu2xGNYSEAacsjdVmdcZSJv0ICnu/bMmy0y+
        E11WxcK+ntW2zmNlJYEtFY86Wesirb5f+8TM0OyJus+YVoTRd0LKjNhFdF93LIxL
        X5/F1n4N8hupdBnMpqxuBo6fbStryS16Sv6n8cLzySPoEqGdZHg1d9oc7m1LHAZQ
        jRdBbCwZXpITyJnPYp7Rbfp/YgVnKt7QRCktg4X1Tor6v/ma1WAaStWOdnfk4RyR
        GtiVJ4ceomV3cXrdmZ53+9dl+K5dL90/BZAnum/hqLcw6VYeCUEWr5cvVsVXBvxd
        SSARh+y36zk2vtrWfGZm052Eb0hCKj9iR4qcIqH5ee1tuu+sBCv8VJLWbVYk5afz
        qTjwg+8Wk5SeSh3Ojh1ktAqwIdpevDnkMvILZzibVoBGV7uGxQ9TDqJt1PDUbQyb
        8eShO2FqEzoVqUxgv0So0Ellx6w7MNDxKsENmZ931+qodwk+vQlW+j/uSlE7WF8G
        hbdUOJyNQeKaYpMKrT+o69sYEvseALfCTS4/WqZGliUW3WIKMSAvr0rtyYNbYs1E
        j0nnKt0Tj8c8CGzVH+LE7p04YJmuB4bmoyTVLRgdHUIPO8UJytKxNFP1FnWTcv/Z
        EBqKOHiiabHk9ryCobi4lP2jmxJ5EuExWOyTHzPJLL4sbfmPgpKdrerIkdrLE5+d
        60f+EagggCX762etHIslc6mnIyhiQsY3pMqx4TU6KHV7pwtbfsDbHaurgZIya5JN
        CmppPju0+hVQs6frci/fJEP3dC0CGmka/jmf3hCNYa4JedTv0uwdpC6Shz/k++RJ
        1vjoIJmGuM6I23/Y8m0FLLv7ADRHskuVNUkCntkGPk8T+GTdC1mPTRqwHAMv30VT
        R9BHwWyrmzSGKL3gzUyoZ+XAllz6groi6GWMrWNejNhSx/FlUckuKNgeu+Br8X90
        btIzKVKmzrKG4386oNjY2ax0DsuZXmwwCqA7KCoz1BTFA6781RTgZgn4Wzlh8O49
        u9ewPmP+2Gv1ye1RaAyHQ38Ke85nKr0bLtdUz6KwqEt1OW5XP+gbeEE8kSpXVZ+c
        ZFdcIp2CC2tfHD+8JeR00mygvhQmbKmKAIk529TGgYK1Mb1F/PnaRDfpAWpQlr0Q
        BDaXbOP7PhvwncO1rPBhcvNNInmErMZ9oHKrjl3uA6gwSqlo2bRnghV0TKcyWyO2
        xcnjX7FQs6aiJZU/I8e/0uFPbqx0JUETsPmi4Au5UN+xNjwFyGWSMs76CkNfKanw
        0Uq1xWtaiLZsQSGavURBynbMgx3i2aXTwmGYNwOLVm0hhexzCghN2U+wT+wCQdhH
        nmY=
        -----END ENCRYPTED PRIVATE KEY-----
Request a Transcript
One of the attributes of an endpoint that can be used in the search criteria is the document type name. Endpoints that are intended to handle transcript requests should specify "Transcript Request" as the document type. When an EdExchange member wishes to request a transcript from a particular institution, the search for an appropriate endpoint (one that specifies "Transcript Request" as the document type.
Note that the reference implementation does not currently implement the handling of transcript requests.
- The institution that is the record holder creates an endpoint to handle transcript requests. Optionally, this can be done by a service provider on behalf of the record holder.
- The requesting institution uses the endpoint to send a document, in this case, a transcript request such as a TS146 to the record holder.
-
The receiving network server procesess the trancript request by executing the following in any
particular order:
- Send an acknowledgement for the transcript request to the sending network server.
- Send a document, in this case, a transcript, in response to the transcript request to the requestor.
Sign a Document
An institution or service provider must provide an certificate obtained from a certificate authority to the directory server. This process requireds that a public/private key pair be generated.
When a document such as transcript or transcript request is transferred to an endpoint, the digital signature of the document must generated using the private key and transmitted with the signed document.
Send a Document
Both institutions and service providers can send documents through EdExchange after providing a SSL certificate.
- Find an endpoint for a particular recipient and document.
- Digitally sign the document.
- Upload the document and digital signature, along with the required parameters to the endpoint using a multipart/form-data HTTP POST.
Update Institution to Service Provider
If an institution initially chooses to use a service provider, but later, decides to implement a network server and begin sending and receiving documents for themselves, it's easy for a PESC administrator to enable the institution to do so.
- Create a user account for the institution's administrator.
- Edit the institution's organizational profile by making is a service provider, in addtion to an institution.
- The institution must still go through the required step to configure itself to send a document and receive a document.
Enable an Organization
There are 4 events in which an EdExchange organization can become disabled. In each case, a PESC administrator must review the organization's information and explicitly enable the organization. The enabled property can be updated using the organization resource or through the directory server web application by a user with appropriate permissions.
- A newly registered organization is created in a disabled state.
- When an organization's signing certificate is created or udpated.
- When an organization's network certificate is created or udpated.
- Whenever a PESC administrator explicity disables an organization.
Create an Endpoint
Endpoints are URLs and related attributes that are hosted by the network server of a service provider. The endpoints resource can be used to manage (create, read, update and delete) endpoints for a particular service provider. The same operations are available through the directory server web application to an authenticated user with the appropriate permissions.
-
The receiver's organization administrator uses the endpoint resource or the directory web
application to
create the endpoint. The following attributes are required:
- The URL must use HTTPS
- The hostname in the URL must match the hostname on the published SSL certificate.
- Endpoint Type: Must be 'Web Service'.
- Document Format: The document format name as defined by the directory server.
- Document Type: The document type name as defined by the directory server.
- Department: The department name as defined by the directory server.
- Mode: Must be either 'TEST' or 'LIVE'.
Find an Endpoint
- Recipient ID: The directory ID of the recipient institution.
- Document Format: The document format name as defined by the directory server.
- Document Type: The document type name as defined by the directory server.
- Department: The department name as defined by the directory server.
- Mode: Must be either 'TEST' or 'LIVE'.
- Query the endpoint resource using the REST API.
- The directory server returns all endpoints that fulfill the search criteria and where the endpoint is hosted by a service provider that is enabled.
Create a Serviceable Institution
A serviceable institution is an institution that has been placed into a logical group that represents the schools for which a service provider can send and receive documents. An institution can belong to multiple groups and have multiple service providers.
The service providers resource can be used to operate on serviceable institutions including updating the serviceable institutions for a service provider.
It is possible, if unlikely, for a institution to have multiple service providers. This means that when the EdExchange directory is queried for an endpoint, multiple endpoints will be returned to the API caller. In this case, it is up to the caller to select which endpoint in which to send the document.
The best way to install docker for OSX is to use native docker, as opposed to Docker Machine. Native docker will make development and use of docker with EdExchange work without modifications.
Get native docker by downloading it from https://www.docker.com and following the instructions. After you've successfully installed docker, there is one more step involved in configuration, so that the docker daemon integrates with Maven during the build process...
- Open a terminal.
- cd ~
-
Using your favorite text editor, add the following line to your .bash_profile script:
export DOCKER_HOST=unix:///var/run/docker.sock
- Source the script: source .bash_profile
- Restart docker.
- Rebuild EdExchange mvn clean install from your source repository directory.
Upload Serviceable Institutions CSV
The EdExchange web application allows authenticated users of the service provider to upload a CSV file where each row in the file creates an institution and adds it to the provider's group of serviceable institutions. Alterntively, service providers can use the institution API resource by first creating the institution and then adding the institution to the service provider's group of serviceable institutions using the relation API resource.
Download the CSV template file here. Consult the school codes section for information about code requirements.
Assign an Endpoint
In order to receive documents of behalf of a serviceable institution, the service provider must associate one or more endpoints with the institution. This can be done using the EdExchange web application by an authenticated user with the appropriate permissions, or by using the organizations API resource.
Manage School Codes
There are a number of attributes that are used by the API that are used to search the EdExchange directory for institutions and endpoints. The attributes include different types of school codes. EdExchange supports and validates the following school codes:
- FICE: 6 digits
- ATP: 6 digits
- ACT: 4 digits
- IPEDS: 6 digits
- OPEID : 8 digits
School codes can be managed through the directory server web application by an authenticated user with the appropriate permissions. School codes can also be managed using the school codes resource or alternatively by using the school-codes property of the organizations resource.
Manage Contacts
EdExchange member organizations can have one or more contacts that are presented in the EdExchange public directory. Contact information is intended to provide users the abiltity to contact the organization for support, questions, etc.
Contacts can be managed through the EdExchange directory server web application by an authenticated user with the appropriate permissions. Contacts can also be managed using the contacts resource of the API.
Manage Users
The EdExchange directory server web application provides the ability for each organization, both service providers and institutions, to maintain a group of users that can manage their organization using through the web application.
An organization's users can be managed through the directory server web application by an authenticated user with the appropriate permissions. Alternatively, users can be managed by operating on the users resource of the API.
Verify a Digital Signature
- Receiver obtains the senders SSL certificate from the directory server.
- Receiver extracts the public key from the certificate and generates a digital signature for the document.
- Receive compares the generated digital signature with the digital signature provided by the sender with the document.
Register an Organization
There are various ways in which an organization can join the EdExchange network.
New applicants can register by filling out the registration form. The registration automatically creates an administrator account for the individual listed in the registration form as the contact. This account has administrator priveleges for the organization. After the form is submitted, the organization's administrator will receive an email notification regarding the registration. At that point, the organization is listed in the EdExchange directory, but disabled. It will remain disabled until a PESC administrator reviews and approves the information that was provided in the registration form. The organization's administrator can conduct normal operations such as setting up the network server and publishing a SSL certificate, while the application is being reviewed.
An orgnanization can also be created directly by an PESC administrator.
Organization's that are institutions can be created by a service provider for the purpose of adding the institution to the provider's group of serviceable institutions. Institutions that are created in this way must also be reviewed and approved by a PESC administrator.
In each case, a PESC administrator is required to review and approve the organization. When a new organization record is created, it is disabled in EdExchange as shown in the directory. Once the PESC administrator approves the organization, it becomes enabled in the EdExchange direcory.
Receive a Document
Organizations that are service providers must host a network server in order to receive documents and publish the certificate used to handle HTTPS. The reference implementation of the network server uses a multipart/form-data HTTP POST endpoint to receive documents.
The use case below describes the steps required to receive a document.
- Receiver creates an endpoint in the directory server that matches the URL used to to receive documents as implemented by the network server.
- Receiver creates an endpoint relation that relates the endpoint with one or more institutions.
- Sender finds the endpoint using the endpoints resource.
- Sender signs the document to send with their private key.
- Sender sends the document to the endpoint.
Create Endpoint Relation
Endpoints must be associated with one or more institutions so that they are searchable based on attributes of the receiving institution and the document itself. An endpoint relation defines a connection between an endpoint and a recipient institution.
When an institution that is configured to receive documents creates an endpoint, that endpoint is automatically connected with itself.
A service provider can assign an endpoint that is hosted by it's network server to any of it's serviceable institutions.
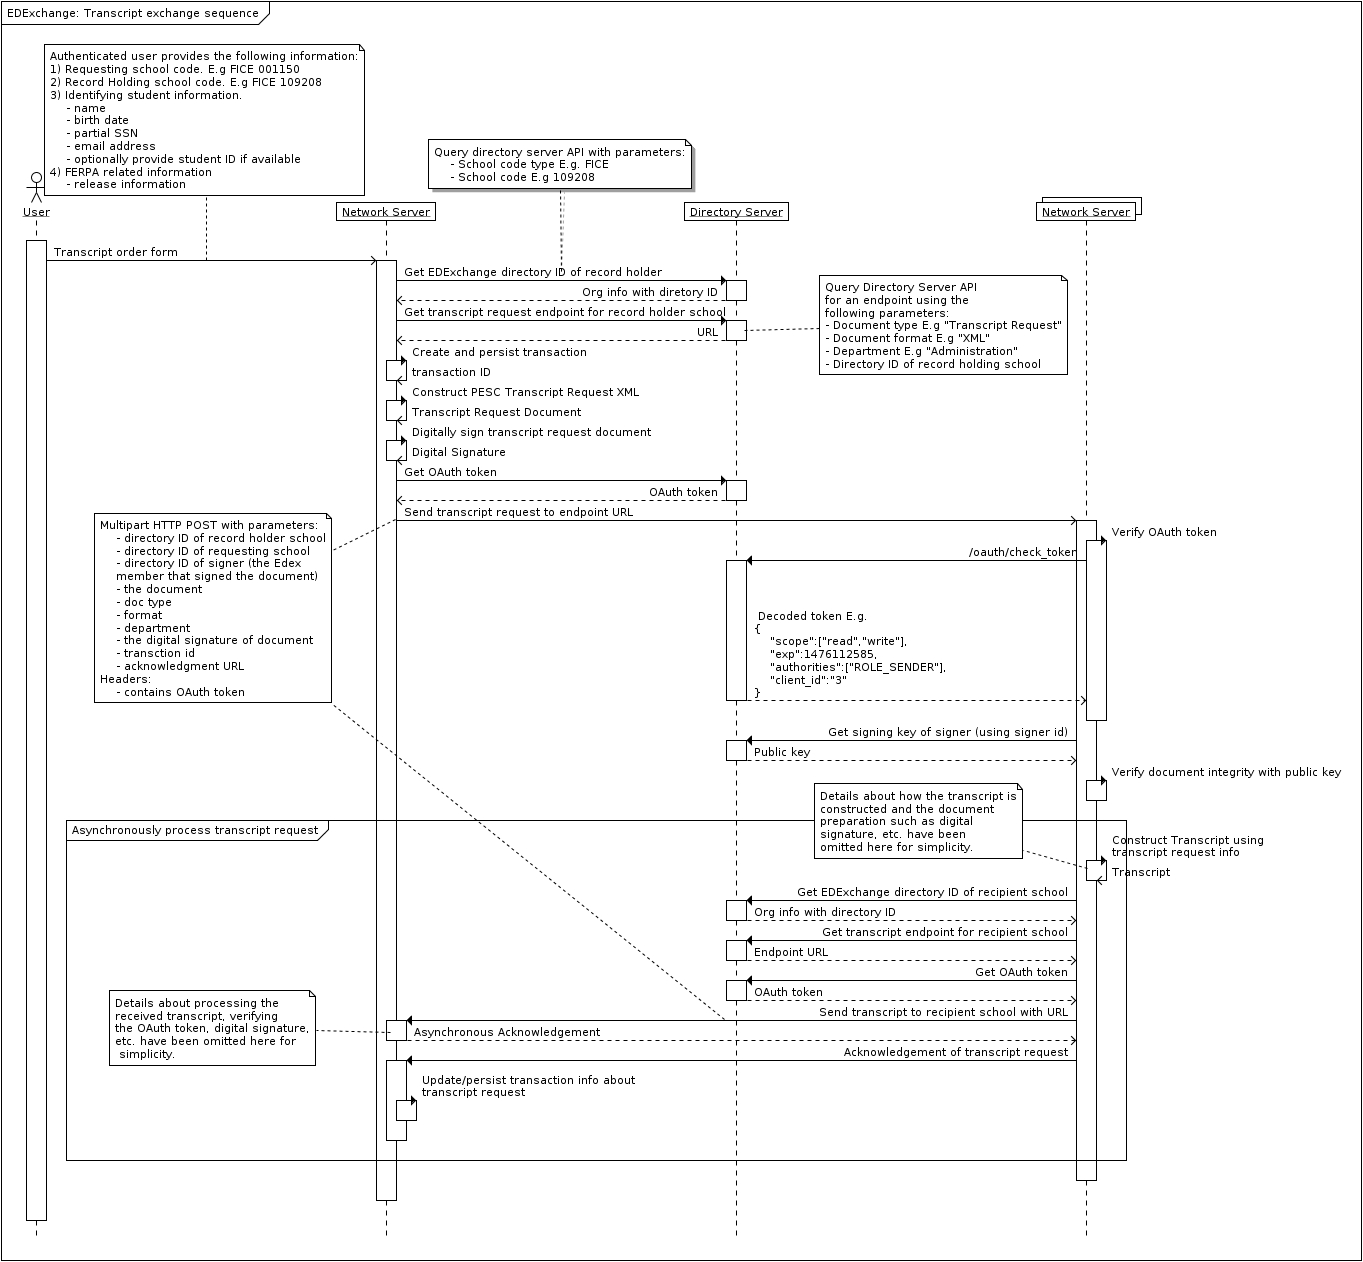
Transcript Exchange Sequence Diagram
The following diagram shows how a transcript is exchanged within the EdExchange network.